电影级人物叙事分镜大片
Prompt
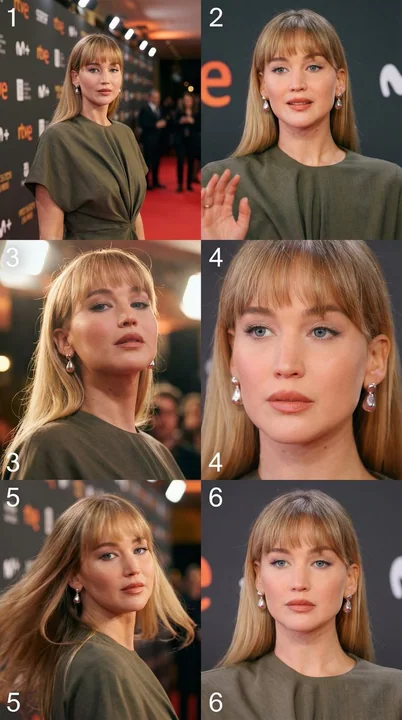
请使用上传的照片作为唯一的视觉参考。 人物身份必须最大程度地保持准确:面部、面部特征、年龄、性别、身体比例和整体外貌必须保持不变。 请勿凭空捏造或添加原始图像中不存在的任何内容。 步骤 1:对源图像进行详细的视觉分析 首先,对上传的图像进行仔细的视觉分析,包括: 图像中的人物(人物、人数、在画面中的位置) 身体姿势和凝视方向 面部表情和情绪状态 服装和配饰 光照条件、时间、色温 环境、背景和空间深度 场景的整体情感基调 步骤 2:电影式 3×2 分镜网格 分析后,从单张图像中创建一个电影式 3×2 网格(6 帧),就像电影中的一系列镜头一样。 整个网格的总体要求: 格式:一张包含 3×2 网格的图像 所有帧必须按从左到右、从上到下的顺序编号 1–6 视觉风格:写实、电影感、非插画风格 一个连贯的角色和环境,具有逻辑上的连续性 每帧必须在姿势、摄像机角度或摄像机距离上有所不同 序列应给人时间流逝和场景发展的感觉 无面部扭曲,无身份或外貌改变 帧描述: 帧 1(第 1 帧) 广角建立镜头。 摄像机离主体最远,展示完整的环境和背景。 人物感觉像是周围空间的一部分。 帧 2(第 2 帧) 中景镜头。 摄像机移近。 姿势略有变化,揭示内在情绪或心境。 帧 3(第 3 帧) 低角度或侧角度镜头。 增加戏剧性或张力,强调身体形状和透视。 帧 4(第 4 帧) 特写或中特写。 聚焦于面部、眼睛和情感。 细节清晰可见。 帧 5(第 5 帧) 动态角度:对角构图或摄像机运动。 姿势变化最大,营造出动作或动感。 帧 6(第 6 帧) 最终镜头。 平静、沉思或情绪得到解决。 摄像机可能更近或更远,但画面给人一种结局的感觉。 灯光和电影感一致性: 所有帧的灯光必须保持逻辑上的一致性,如同在一个连续场景中拍摄。 景深、灯光和色彩分级应强化电影感。 最终结果: 输出应类似于专业的电影分镜图,如同在一次拍摄和同一地点完成,具有强烈的真实感和叙事流畅性。
更多提示词
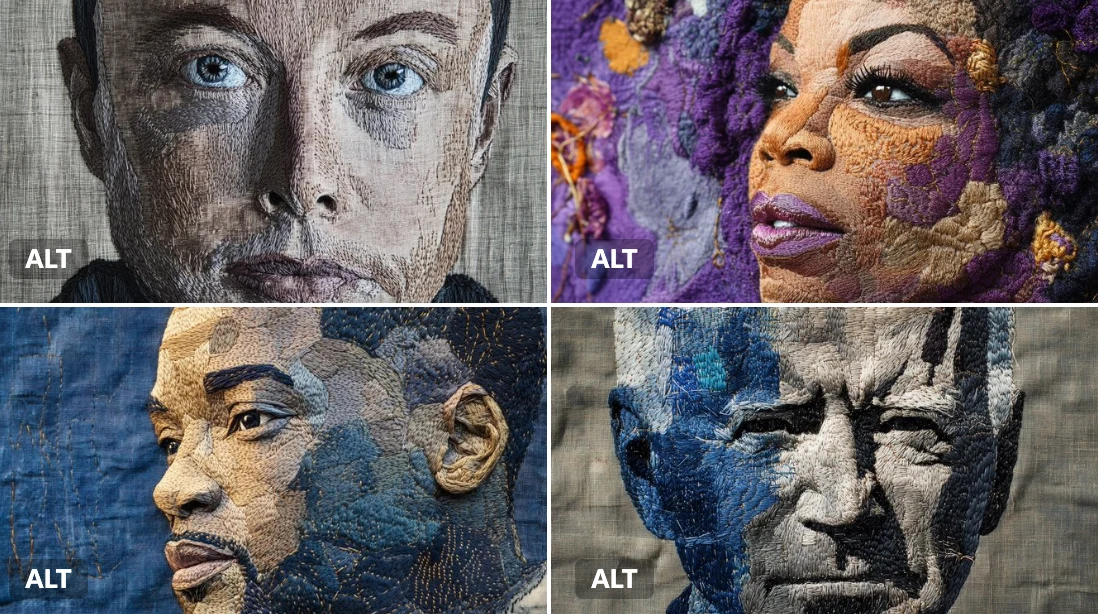
刺绣肖像
一幅刺绣肖像,以[颜色]线在深色亚麻布上缝制。可见的针脚、层次分明的纹理和手工图案赋予其一种质朴而神圣的感觉。 一幅埃隆·马斯克的刺绣肖像,用丰富的钢灰色和电光蓝色线在深色亚麻布上缝制。可见的针脚、层次分明的纹理和手工图案赋予其一种质朴而神圣的感觉。
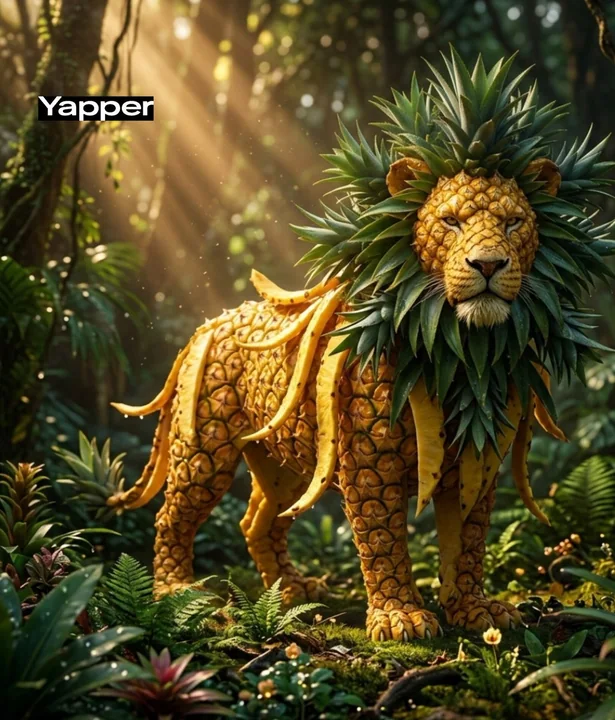
奇幻西瓜大象雨林奇遇
一只由巨大西瓜制成的异想天开的大象。身体是深绿色条纹的西瓜皮,部分切开的切面露出了鲜红多汁的果肉和瓜子。耳朵形状像大片西瓜,在阳光下略微半透明。它矗立在郁郁葱葱的热带雨林中,弥漫着柔和的薄雾和发光的光线,超逼真的3D渲染,奇幻生物设计,高细节,电影级灯光,鲜艳的色彩。
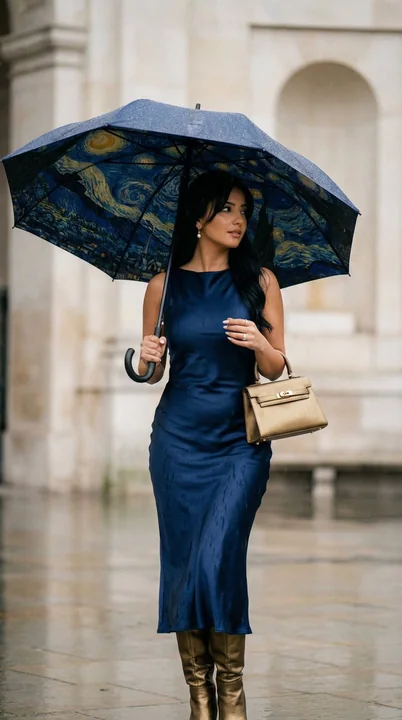
星月夜雨伞下的缎面佳人
{ "generation_request": { "meta_data": { "task_type": "cinematic_rain_fashion_transformation", "language": "en", "priority": "highest", "version": "v2.0_STARRY_RAIN_STANDING_LOOK" }, "input": { "mode": "image_to_image", "reference_image_usa
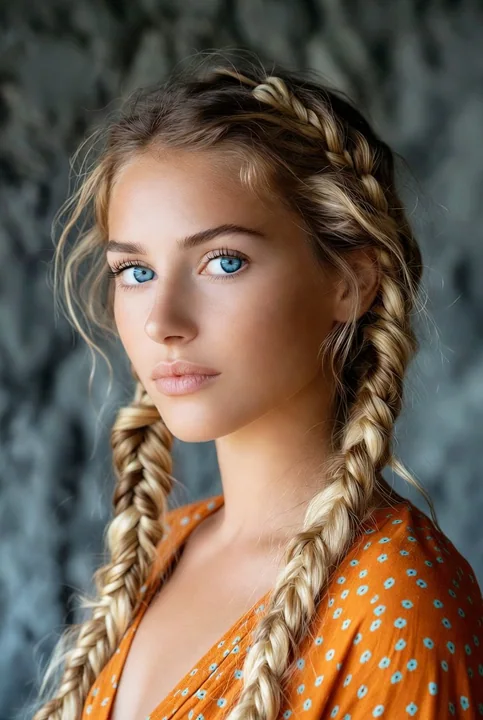
金发双马尾少女电影感写真
一张高分辨率、电影感十足的肖像照,画面中是一位年轻女性,金色的头发被编成两条粗厚的荷兰辫。她拥有一双柔和的蓝色眼睛、白皙的皮肤,以及平静而安详的表情。几缕松散的波浪形发丝轻柔地环绕着她的面部轮廓。她身穿一件橙色V领衬衫,上面点缀着小而精致的白色波点图案。背景是一面深色、富有纹理的炭灰色墙壁,景深较浅,营造出柔和的背景虚化效果。柔和的自然日光从侧面照射在她的脸上,以温和的光晕突出了她的面部特征。
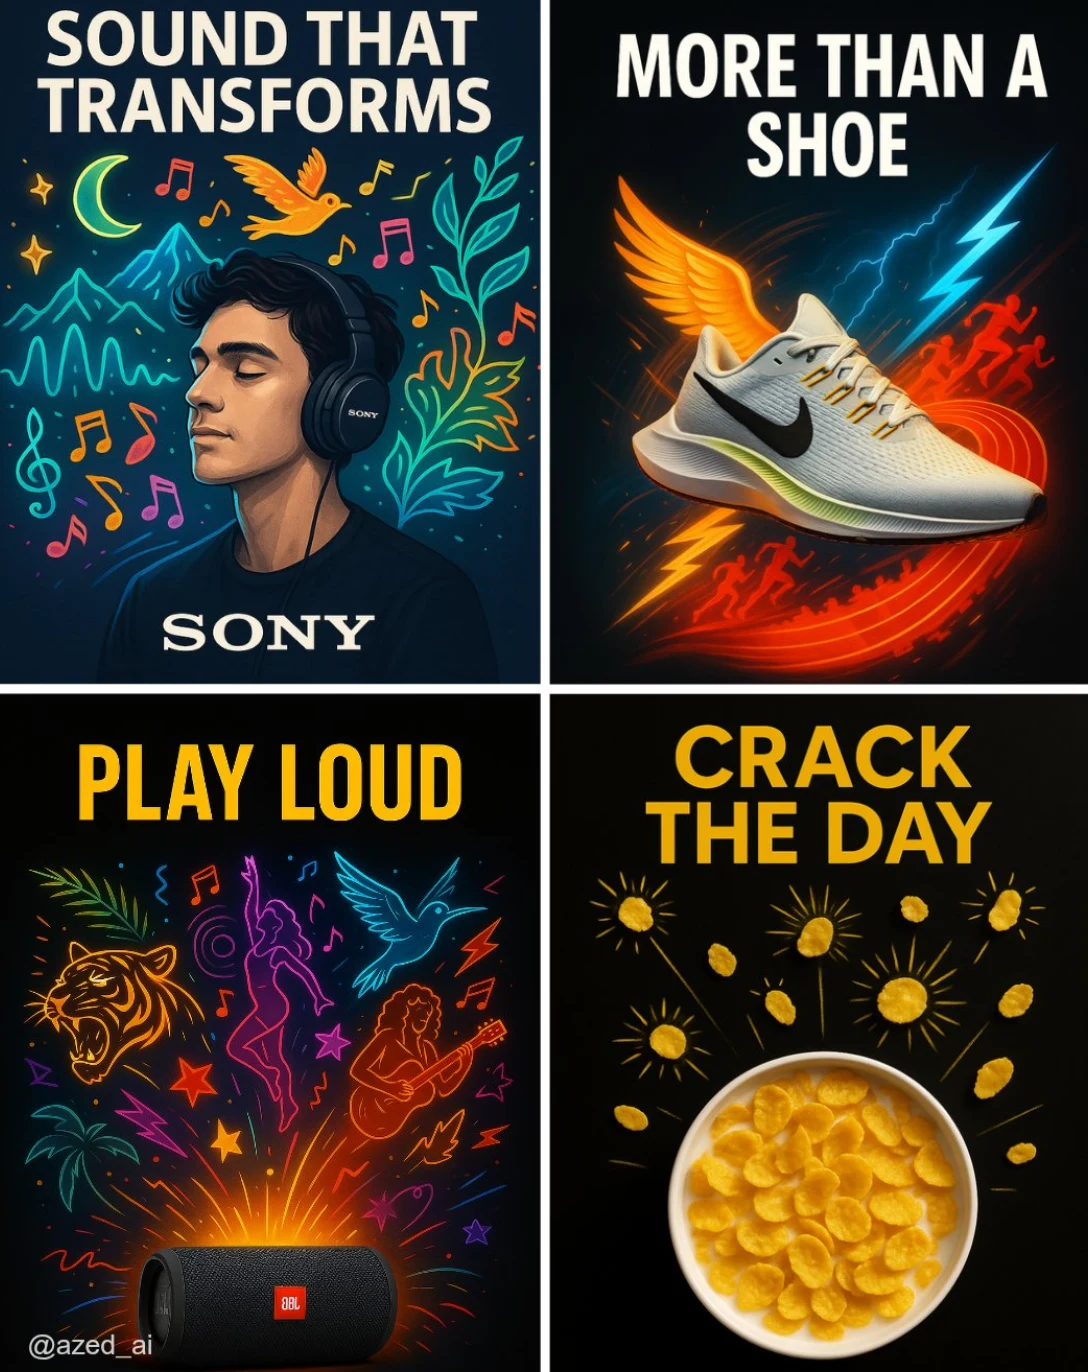
创意广告
以干净、深色或高对比度背景为衬托的高影响力广告。[产品]位于画面中央,照明锐利且细节丰富。其周围是超现实、风格化的视觉元素插图向外迸发(如音乐家、跑步者、卷曲线条、太阳光芒),采用鲜艳的色彩搭配和霓虹效果。顶部有大写粗体的广告文案“[TEXT]”,底部为品牌标志,现代感十足的广告设计。
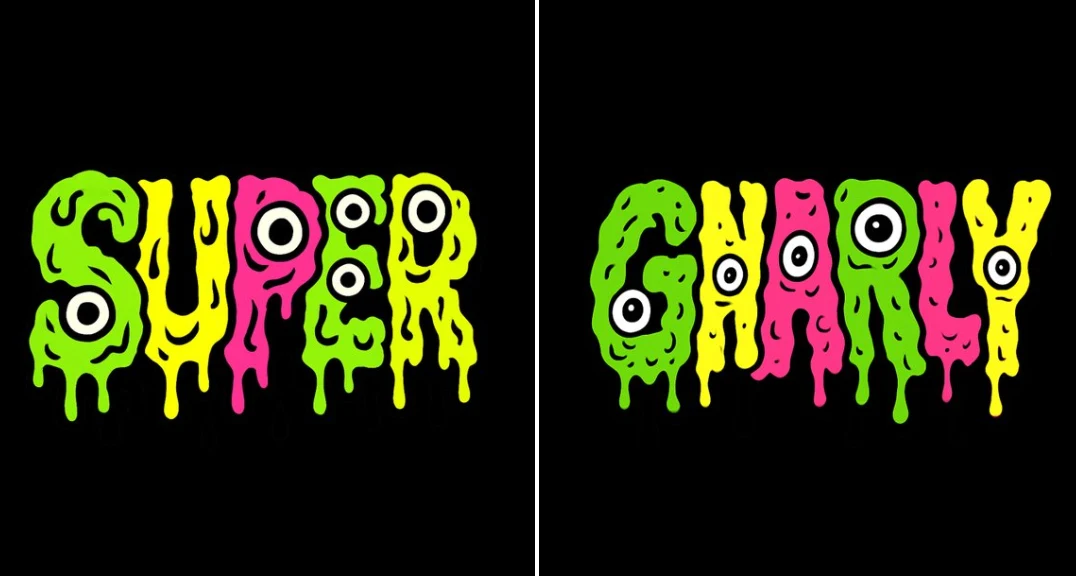
融化变异文本
创建一个迷幻、怪诞的卡通风格文字设计,显示“GNARLY”。将字母排列成一条直线。每个字母应呈现肿胀、融化和渗出的效果,并使用明亮且冲突的纯色,如污泥绿、霓虹黄和热粉色。每个字母必须仅填充一种纯色,不能有渐变或过渡。所有滴落、融化和渗出的部分都必须是纯黑色,没有阴影或渐变。设计需适合矢量图形,具有清晰的纯色填充和粗黑轮廓线。添加额外的黑白眼球,使每个字母看起来像奇怪的突变生物。保持构图混乱但可读,如同周六早晨卡通的突变版本。背景为黑色,采用正方形比例。
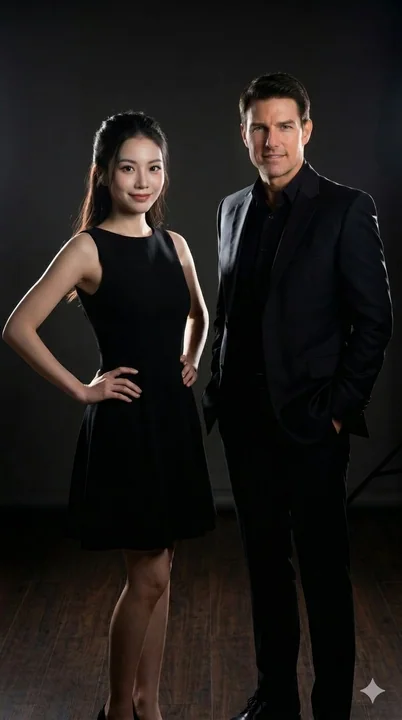
A minimalist studio portrait of a man and a woman against a dark background.
一张垂直方向的专业影棚肖像,背景深色且极简。左侧站着一位东亚女性,留着深色长发,梳成半扎发型,身穿一件简约的黑色无袖 A 字裙。她双手叉腰,直视前方,露出温柔而自信的微笑。右侧站着一位白人男性,留着整齐利落的深色短发,身穿一套利落的全黑定制西装,内搭黑色纽扣衬衫。他一只手随性地插在口袋里,面向镜头,神情沉稳而自信。两人均以中远景拍摄,戏剧化的电影感影棚灯光凸显出他们在深色场景中的身形轮廓与侧影,强调出精致、正式的氛围。
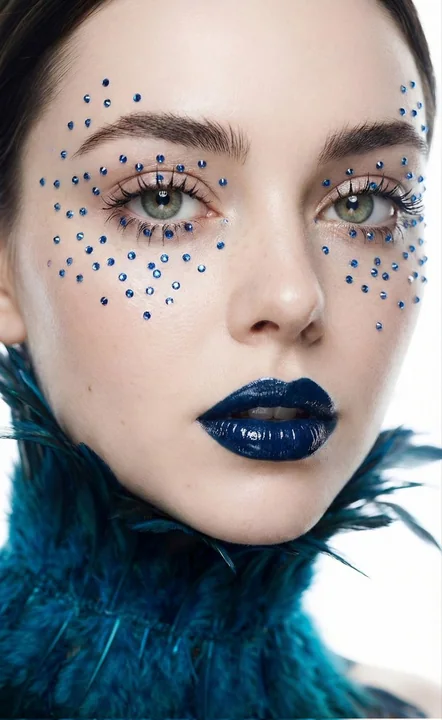
蓝宝石泪滴凝结在苍白的脸颊上
电影级写实风格,9:16 垂直构图,8K 超高清,使用 ARRI Alexa 65 搭配变形宽银幕镜头拍摄的极致特写美妆镜头。[my face reference] 作为模特,脸部朝向镜头。她的皮肤苍白无瑕。她的眼睛和太阳穴周围点缀着细小的蓝宝石色水晶,仿佛凝结的泪珠。她拥有光泽饱满的深海军蓝色双唇。她身穿一件孔雀蓝色的高领羽毛衣领,勾勒出她的下颌线条。灯光采用柔和集中的影棚式美妆灯,将她从模糊的明亮白色背景中突出展现。
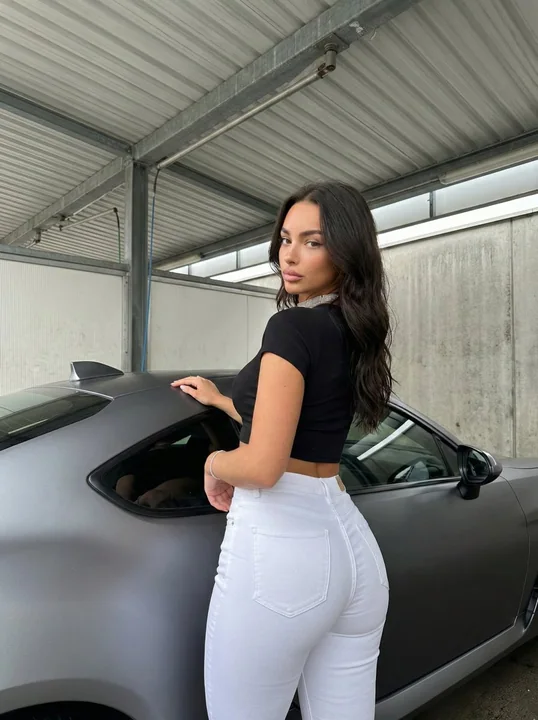
时尚辣妹在洗车房倚靠跑车回眸
{ "subject": { "description": "一位皮肤黝黑、留着长长的深色波浪发、发丝垂至背部的年轻女性。", "features": { "face": "下颌线分明,嘴唇丰满,鼻梁挺直,棕色眼睛,表情中性略带魅惑。", "hair": "深棕色至黑色,长发,松散的波浪,中分。", "body_type": "曲线玲珑,身材健美,沙漏型身材,牛仔裤凸显臀部曲线。" }, "outfit": { "top": "黑色罗纹短袖露脐上衣,紧身,露出腰部。", "b